
Curious about how you can use the Oracle Campus Solutions notification framework to trigger the push notification flag within the Oracle Unified Navigation header?
Since fluid unified navigation was introduced by Oracle, we have the ability to notify users by means of the push notification flag. This is extremely useful in cases when we want attention of our users to follow up on certain actions in the system.
Currently there is no out of the box support for the Oracle Campus Solutions notification framework to notify users through the push notification flag. Fortunately, by levering the existing Campus Solutions notification framework and some PeopleCode, will give you a powerful and flexible notification mechanism.
This is how it works in general: A query will pick up users (e.g. students or administrators) that need attention (meet certain criteria). A batch job will then execute this query periodically and sent a message to the user’s push notification window.
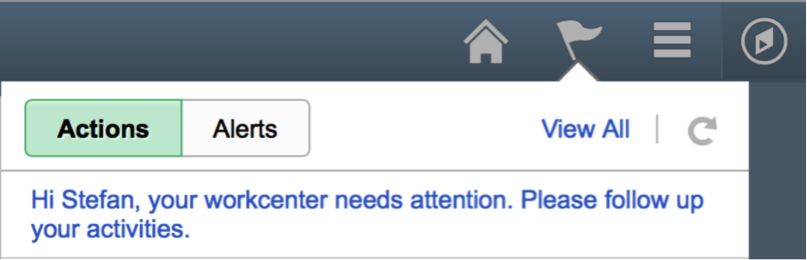
In this example I will create a notification targeted at administrative users having things to-do in their WorkCenter. So instead of writing them an e-mail, the admin users can directly see the message in their Fluid notification window at the top, click on the flag and drill down to the specific task.
The following picture shows the end result. Having a notification that shows a brief explanation of the action we want the user to follow. When the user clicks on the link, he will be redirected to the WorkCenter.
So lets create some notifications!
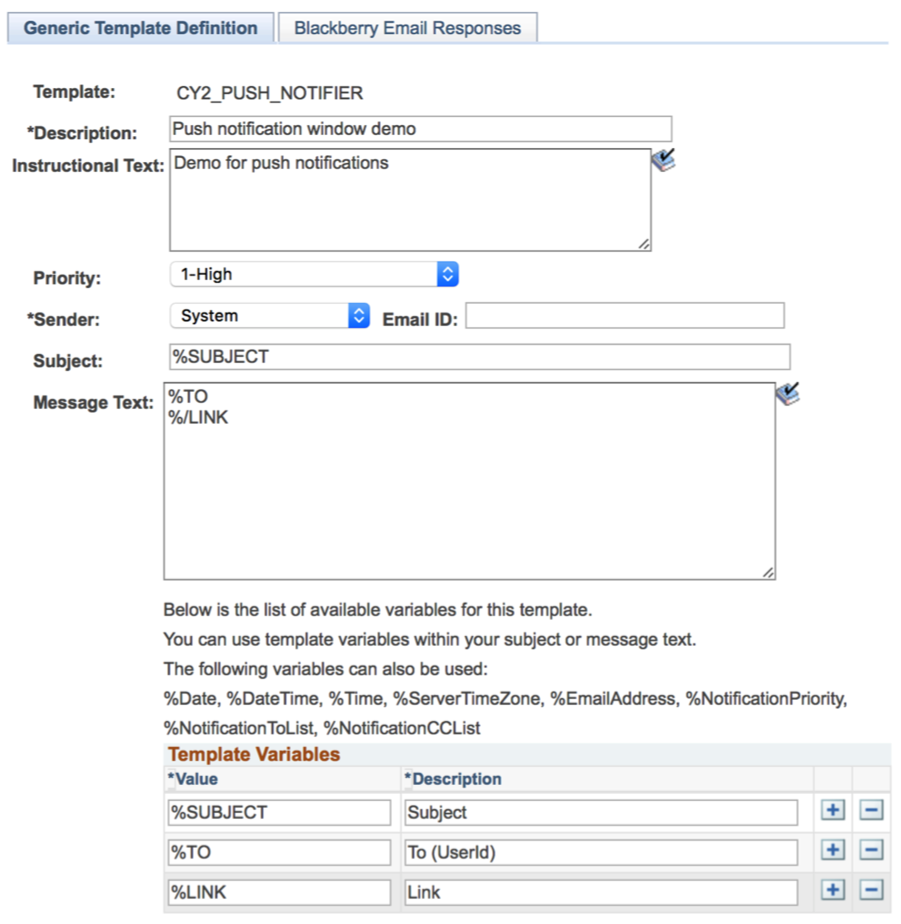
Step1: Create a template
Go to: Peopletools > Workflow > Notifications > Generic Templates\
You will create a simple template with three variables: %SUBJECT, %TO, %LINK.
Save your template, when you’re done.
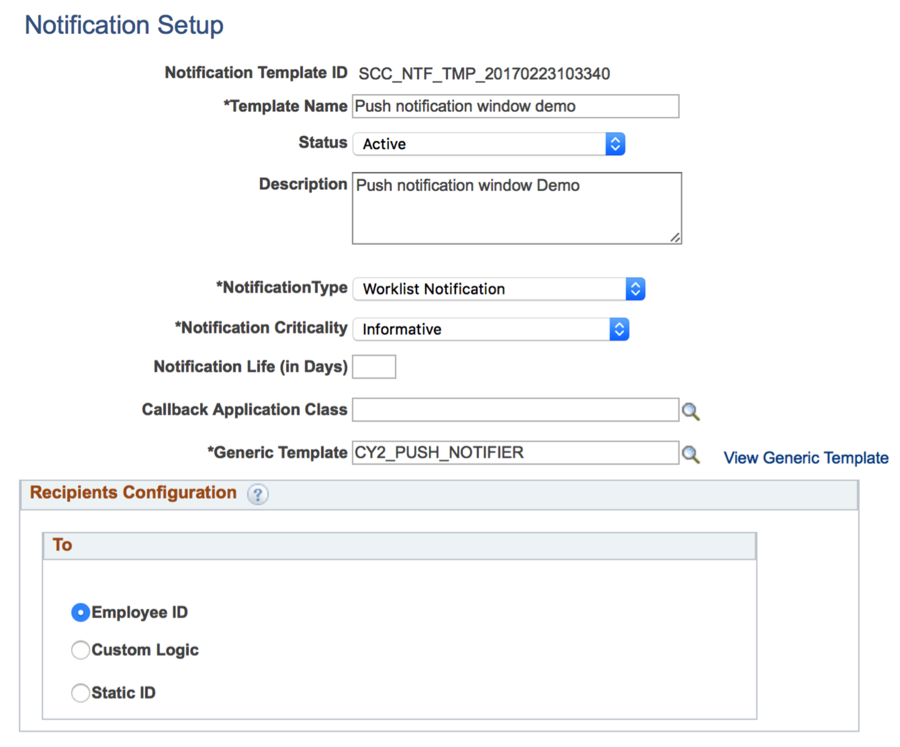
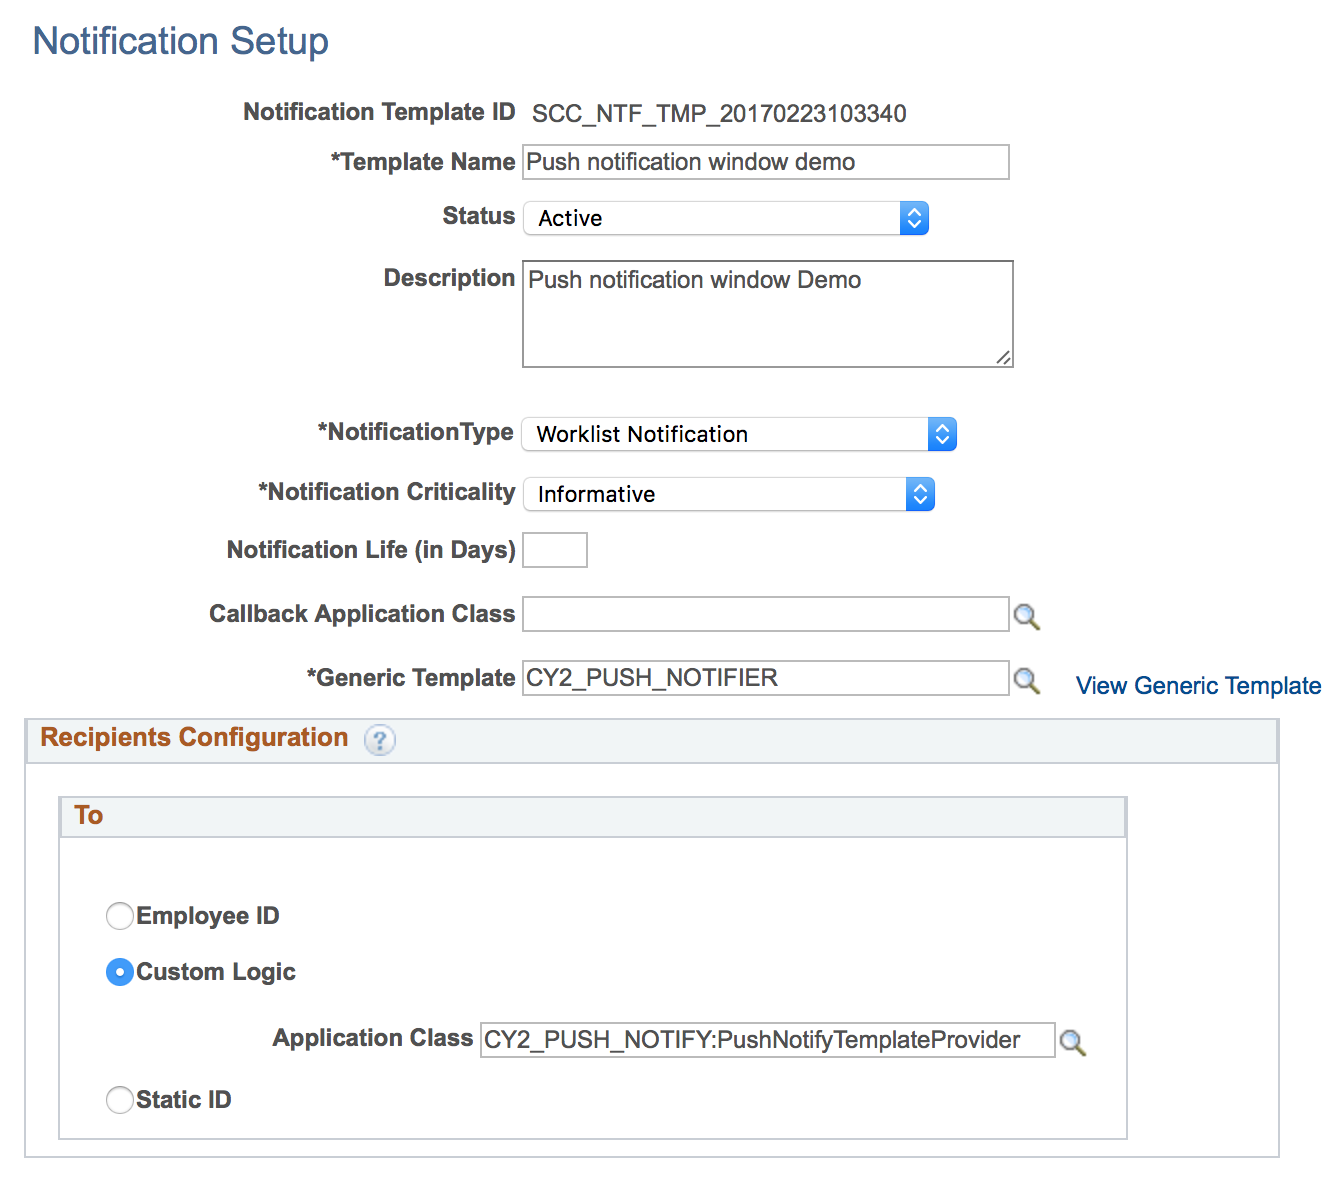
Step 2: Create a Notification Setup
Go to: Set Up SACR > System administration >Utilities > Notifications > Notification Setup
Make sure the Generic Template you’ve created in step 1 is referenced here.
Keep the Recipients Configuration on Employee ID
In Step 7, we return to this screen and activate the Custom Logic bullet point and add our own application class.
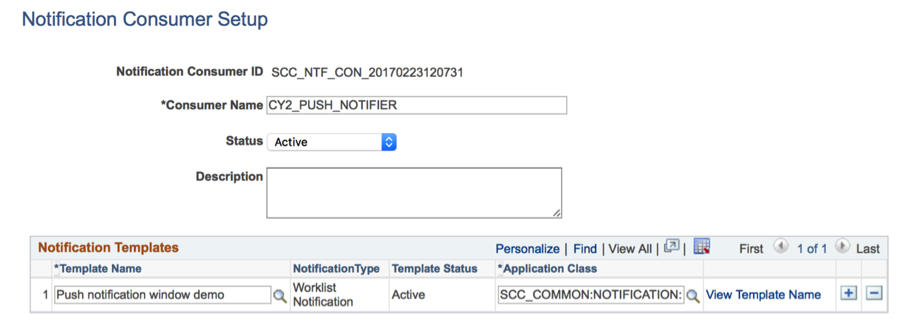
Step 3: Create a notification Consumer
Go to : Set Up SACR > System administration >Utilities > Notificaitons > Notification Consumer Setup
Make sure you reference the template created in step2. You can fill in the standard available application class SCC_COMMON:NOTIFICATION:BaseParameterProvider
Step 4: Create your query.
One thing that makes the Oracle Campus Solutions notification framework so powerful is the population selection batch process driven by queries. Go to the reporting tools query manager and create a new query.
For this example I just created a very simple one. There are however three restrictions for your query.
- It must include the record PEOPLE_SRCH.
- EMPLID should be one of the fields in the output.
- Every field in your query that we want to map on to our template variables
needs to be added in the form of an expression with a specific Unique field name.
The three requirements above will be checked once we fire off our batch process in the last step. For now, it is important to gather the right fields in the query.
Apart from the required EMPLID field, we need the fields that we want to map on to the template variables created in the first step.
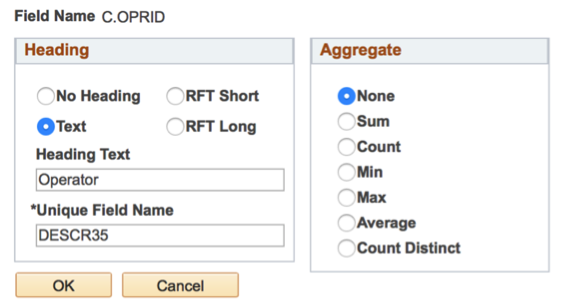
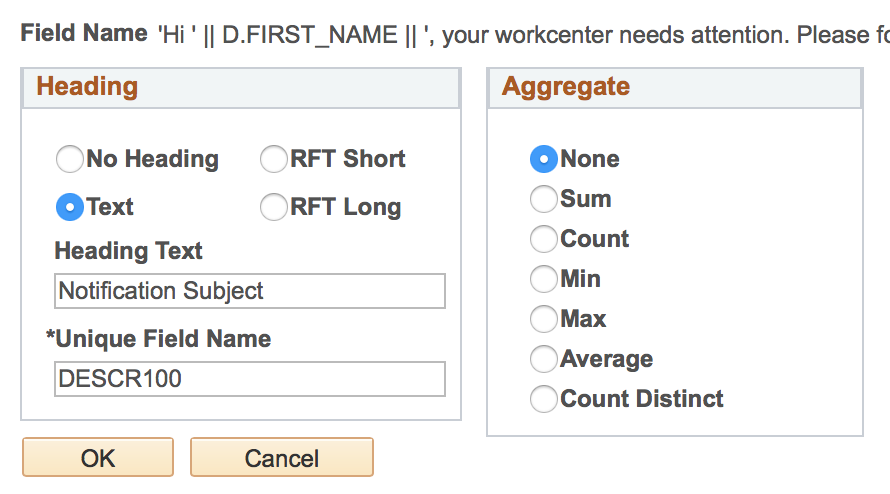
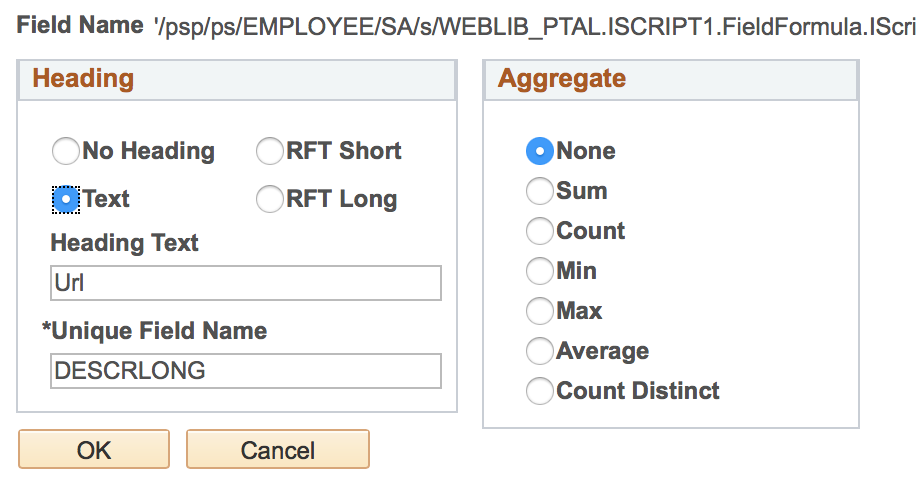
Since we have the template variables %SUBJECT, %TO and %LINK, we want to select the right fields in the query that resemble these variables. In the query the first three fields are expressions with their unique field name being: DESCR35, DESCR100 and DESCRLONG.
The Unique Field name needs to be one of the fields defined in the record SCC_BAT_NTF_TGT. This record is used by the notification framework to map query fields to notification texts.
Underneath an example of the first three fields. We created an expression of the C.OPRID and renamed that to the Unique Field Name of DESCR35 (left). Likewise, our notification subject is an expression with Unique Field name DESCR100 and combines the first name with a static descriptive text. (middle). Finally, the Url field is an expression containing the relative url that points to our workcenter with Unique Field name DESCRLONG (Right).
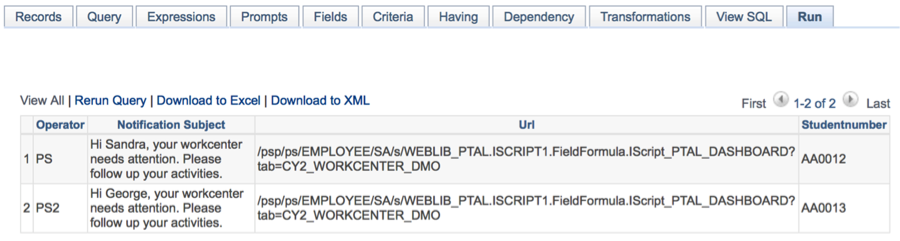
As a final note: make your query population small at first, just for testing things out. I’ve got mine resulting in two lines sending the notifications to two accounts (PS and PS2). In the picture below you see my query test result.
Step 5: Create an application class
Create a new application package and create an application class within that.
I’ve called mine CY2_PUSH_NOTIFY:PushNotifyTemplateProvider. This is how it looks.
import SCC_COMMON:NOTIFICATION:BaseParameterProvider;
import SCC_COMMON:NOTIFICATION:INotificationContext;
import SCC_COMMON:NOTIFICATION:BaseNotificationContext;
import PTPN_PUBLISH:PublishToWindow;

class PushNotifyTemplateProvider extends SCC_COMMON:NOTIFICATION:BaseParameterProvider
   method PushNotifyTemplateProvider(&p_ntfCntxt As SCC_COMMON:NOTIFICATION:INotificationContext);
   method getValueAsString(&pParamValue As string) Returns string;
end-class;

method PushNotifyTemplateProvider
   /+ &p_ntfCntxt as SCC_COMMON:NOTIFICATION:INotificationContext +/
   %Super = create SCC_COMMON:NOTIFICATION:BaseParameterProvider(&p_ntfCntxt);
end-method;

method getValueAsString
   /+ &pParamValue as String +/
   /+ Returns String +/
   /+ Extends/implements SCC_COMMON:NOTIFICATION:BaseParameterProvider.getValueAsString +/

   Local SCC_COMMON:NOTIFICATION:BaseNotificationContext &myContext;

   /*SvL: Create variables and PushWindow object */
   Local string &To, &Subject, &Link;
   Local PTPN_PUBLISH:PublishToWindow &oPW;

   &myContext = %This.context As SCC_COMMON:NOTIFICATION:BaseNotificationContext;

   /* SvL: map variables to template */
   &To = &myContext.getParameterMap().Get("%TO"); /* TO */
   &Subject = &myContext.getParameterMap().Get("%SUBJECT"); /* Subject */
   &Link = &myContext.getParameterMap().Get("%LINK"); /* Link */

   /* SvL: Initialize and set type of PushNotification */
   &oPW = create PTPN_PUBLISH:PublishToWindow("SENDNOTE", "Assigned Tasks");
   &oPW.SetCategoryTypeActionable();

   /* SvL: Add variables to PushWindow Configuration */
   &oPW.AddRecepient(&To, 1);
   &oPW.SetOnClickUrl(&Link);
   &oPW.SetMsgInfo(&Subject);

   /* SvL: Do Final Handling */
   &oPW.SetMsgKey(&oPW.GenerateKey());
   &oPW.SetMsgStateNew();
   &oPW.Publish("");

   Return "";

end-method;
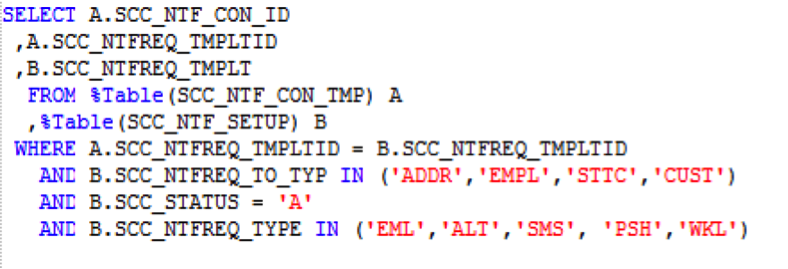
Step 6: Fix the view
Open record SCC_NTFCONTMPVW, used to select templates in the batch notification run control page, and make the change as depicted below.Our edited view makes sure that custom Notification Request will be picked up in the last step.
Difference between the original and the edited view is that both ‘in lists’ are extended with one extra string (CUST and WKL).
Make sure you save and build the view.
Step 7: Put your application class in
Go back to: Set Up SACR > System administration >Utilities > Notifications > Notification Setup
We already been here in step 2. Now click the custom logic bullet and put your application class in you’ve created in step 5.
Step 8: Run your notification
Go to: Set Up SACR > System administration >Utilities > Notificaitons > Batch Notifications
Finally it is time to bring all the pieces together and test our notification setup.
Thick the population selection checkbox and select your query here.
Then choose your notification consumer ID and finally your template.
At them bottom you can map your template variables to the fieldnames in the query.
If your happy with your configuration, save it and run it.

Once the process is finished, you should see the flag indicating that there is a new message.
So here you have it! A powerful and flexible way of levering the CS notification framework sending its messages to the push notification window. You can create as many queries you want and add them in different batches to notify users.
Final thoughts
As you have noticed, I (mis)used the notification type worklist, in step 2.
You might wonder why I didn’t use the available push notification type during the notification setup in step 2. Well, this one is aimed at pushing information to mobile devices and not the push notification window.
The PeopleCode written in step 5 was copied from SCC_NTF_TESTER:NotificationTemplateProvider and then slightly adjusted.
If you have any doubts or questions, please feel free to ask!